![]()
Mastering "Downsampling"
This technique
tells how to create an easy to view screen-resolution image that accurately
represents a high resolution scan or digital file. These scans can be captioned
and given unique filenames and quickly
cataloged to aid you in managing your burgeoning collection of images. They
also work great for multimedia presentations (slide shows on your desktop),
on your website, and for passing on to prospective clients and designers that
can use them for a "comp" (comprehensive layout) or FPO (For Position Only).
Access makes life easier
The whole reason for "downsampling" is to create an "access" image
that is a miniaturized duplicate of your optical resolution "master" scan.
The advantage of having both the master and the "access" files differ only
in resolution, but at the same height and width is they can be used as a true
"proxy." In other words I could pass the access image on to a client, and
they can place the image into their design and tell me their need for a file
base on the percentage of the original file. Knowing this percentage
of the original means that it's a simple procedure to give them an optimized,
sized and sharpened image for their needs. Most major page layout programs
such as Pagemaker and Quark give the designer this information on their "control
palette" and/or as part of a summary report. They may also indicate the size
of the window the image is placed in as well.
While you could simply start with a high resolution file and
"drop" the resolution to 72ppi, the resulting file would appear quite "fuzzy"
as most of the edge definition detail would be lost to rounding errors. As
an example, lets assume a grayscale image with an area where a 60 percent
value meets a 50 percent value. Viewed on edge, we might see this:
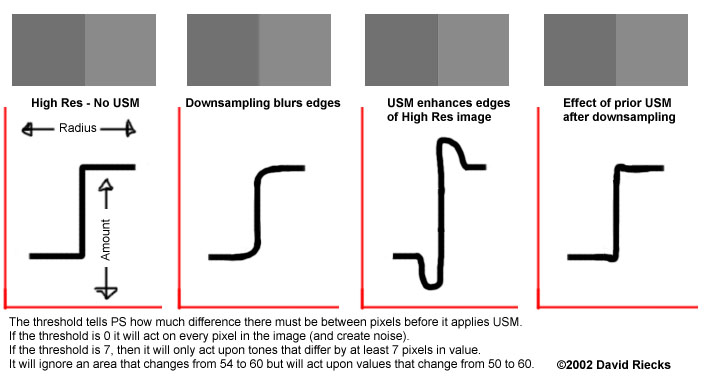
It's possible to preserve most of this edge detail by using
a small amount of Unsharp Masking before each Image, Size command.
By repeating this process through multiple iterations, and cutting the file
size in half each time till you get to screen resolution, you can hold
on to more of the edge detail sharpness.
First of all repeat after me the mantra for this exercise...
"I want to preserve fine detail."
My
Secret Recipes
These are "recipes" for creating access files from RGB TIFF files
scanned from, 100-160 ISO 35mm slides or negatives, on a 4000ppi
film scanner such as the Polaroid Sprintscan 4000 or the Microtek Artixscan
4000t. For suggestions on using this technique with the Polaroid
Sprintscan 35+, (a 2700dpi film scanner) take a look below.
Keep in mind that the numbers I will give you should only be
used as a starting point and will vary by scanner type, image type and film
stock. Point light source scanners will require lesser amounts of Unsharp
Masking, as will higher speed films. Images with hard diagonal lines may
show more sharpening artifacts than more
"ethereal" ones, so you have to use your eyes to avoid oversharpening..
From
4000 ppi film scanner:
I start with a master scan that is approximately 7 x 11 inches at
500ppi. This means that I've already changed my 4000ppi master scans to 500ppi
without resampling, or throwing any data away. Thus the 35mm scan that was
about 1 x 1.5 inches (film size) at 4000ppi becomes about 7.4 x 11.2 inches
(For details on what goes on in the scanning process, see the "master-scan"
page-- in progress). I like this size as it will display in most browsers
(those that are 800 x 600 pixels or larger) without undue amounts of scrolling,
yet is large enough for a photo editor or designer to see the details in the
image and make a decision. Our target image of the same size at screen resolution
will be a 1.15mb RGB TIFF.
Ready?
With the image open in Adobe Photoshop, and at 100 percent (Command/Control
+ Option/ALT + 0 [that's zero]), convert to LAB (Image, Mode, LAB),
choose the "L" or lightness channel from your "Layer" palette (To
open Layers, go to "Window," then "Show Layers" and select the "L" or lightness
layer), and apply a USM of 150 amount, .5 radius, and 7 threshold (Filter,
Sharpen, Unsharp Mask). Observe the results to determine that there are
no obvious halos (this may require moving around the image using the navigator,
scroll, or hand tools). If you see any "really annoying"
halos these can be fixed using the snapshot
or history functions.
The idea here is not to hammer the image with USM, but
to simply hold on to the fine detail that would otherwise be obliterated by
math rounding errors introduced when going from a very large file to a very
small file. If you think you can't see the difference, use undo to
toggle between before and after (command/control + Z).
If you are wondering why you are looking at what appears to
be a weak b&w image don't be concerned. This is the "luminosity" layer
which holds the sharpness of your image. Look at the A and B channels, and
what you will notice is the distinct lack of sharpness in the image. This
is the advantage of using LAB. We could do all the work in RGB, but it would
require first applying the USM filter, and then using the Fade command
and choosing Luminosity mode to get the same result. Only problem is
you are processing the R, G, and B layers twice, and it takes more time since
we will have to USM and downsample the image about five times before we hit
our target resolution of 72ppi.
With that in mind, now select Image, Image Size, and
with the Resample box checked, change the resolution
from 500 to 350 (from here on out I will refer to this as "downsampling".
This should drop the file size of the image by approximately half. Click on
OK. Now apply a USM of amount 140, .4 radius, and 7 threshold. Check
for obvious halos and if necessary remove or fade.
Downsample from 350 to 247ppi, again the file size should be
about half of what it was before. Apply another dose of USM, this time at
130 amount, .3 radius, 7 threshold. Look for obvious halos and if necessary
remove or fade.
Downsample again to 172 ppi. Apply USM at 110 amount .3 radius,
7 threshold. Check for obvious halos.
Downsample yet again to 122 ppi. Apply USM at 100 amount .3
radius, 7 threshold. Check for obvious halos.
Downsample to 72ppi. If you are preparing images for web only,
you may wish to apply one more "hit" of USM, its your discretion. I typically
wait and do that just before or during the creation of a Jpeg for web use.
Convert back to RGB colorspace (Image, Mode, RGB).
That's it, you now have an "access" image that mirrors your master in all aspects except resolution. I would suggest saving the image in a lossless format at this point. TIFF or PSD will allow you to go back later and save as a GIF or PNG image for other methods of display in web browsers, screensavers, Acrobat or Powerpoint presentations. You can use a different code to note that this is an access image if you wish, or simply store in an appropriately labeled folder. For more suggestions on how to integrate this into your filenaming structure take a look at the filenaming page.
If you don't believe this works, try it with an appropriately
sized file, and use this procedure the first time, then reopen the master
file and drop to screen resolution in one operation. Apply USM to your hearts
content, and you still won't have the same level of "fine detail" that
you have preserved with this seemingly repetitive exercise of USM and image
downsizing.
If you are saving out a version as a JPEG or GIF, my suggestion
is to use the Save A Copy As function in Photoshop. This allows you
to have the image open (including layers). Choose Save A Copy As choose
JPEG, and select a compression factor. View the resulting file in your web
browser. If you compressed too much and have too many artifacts you can easily
redo Save A Copy As with a different setting till you have the results
you want.
Keep in mind that if you use the Save For Web feature in Photoshop 6, or use other external image utilities to compress your files for the web, that these may "strip" the metadata that you have spent time placing in the IPTC/File Info section of photoshop. Test any new utility if you wish to have this data in the file to protect your copyrights.
How to remove
Sharpening Artifacts and Halos
Photoshop 4 (or any version
of PS that has the "snapshot" function)
1. Apply the USM filter.
2. Perform an Edit, Undo (Cmd-Z or Ctrl-Z).
3. Then choose Take A Snapshot from the Edit menu.
4. Then IMMEDIATELY, choose Edit, Undo (Cmd-Z or Ctrl-Z) again (restoring the level of USM that you had originally).
5. Choose your cloning /rubberstamp tool. From the Option palette set the mode option to From Snapshot. Opacity can be anywhere up to 100, but I would suggest at least 75 to 100 percent depending on how much you want to restore from the version before sharpening.
6. Paint over those areas with obvious sharpening halos
Photoshop 5-6 (using the
history channel)
1. Go to the History Palette (Window > Show History)
2. Use the USM Filter on the background (or main layer).
3. Click on the New Snapshot Icon at the bottom of the History Palette, or use the drop-down menu and select New Snapshot.
4. Use Edit, Undo (Cmd-Z or Ctrl-Z) and undo the filter
to restore the original image. You can also just click on the history step
just above the last filter operation to restore the image.
5. Click in the blank square area on the left side of the thumbnail in the "Snapshot 1" row to make this your active history brush state. The history brush Icon will move to this area. Don't click on the Snapshot 1 area to the right of the thumbnail or that will become your active painting state and the filter will show its full effect.
6. Select the History Brush and Paint away.
If you wish you can create more than one history state, snapshot,
then switch back and forth between Dust & Scratches, Gaussian Blur, and
Unsharp Masking to get the effect you want.
From
2700 ppi film scanner:
I start with a master scan that is approximately 8 x 12 inches at
300ppi. This means that I've already changed my 2700ppi master scans to 300ppi
without resampling, or throwing any data away. Thus the 35mm scan that was
about 1 x 1.5 inches (film size) at 2700ppi becomes about 8 x 12 inches (For
details on what goes on in the scanning process, see the "master-scan" page--
in progress). Our target image of the same size at screen resolution will
be a 1.25mb RGB TIFF.
Ready?
With the image open in Adobe Photoshop, and at 100 percent (Command/Control
+ Option/ALT + 0 [that's zero]), convert to LAB (Image, Mode, LAB),
choose the "L" or lightness channel from your "Layer" palette (To
open Layers, go to "Window," then "Show Layers" and select the "L" or lightness
layer), and apply a USM of 150 amount, .5 radius, and 7 threshold (Filter,
Sharpen, Unsharp Mask). Observe the results to determine that there are
no obvious halos (this may require moving around the image using the navigator,
scroll, or hand tools). If you see any "really annoying" halos
these can be fixed using the snapshot or
history functions.
The idea here is not to hammer the image with USM, but
to simply hold on to the fine detail that would otherwise be obliterated by
math rounding errors introduced when going from a very large file to a very
small file. If you think you can't see the difference, use undo to
toggle between before and after (command/control + Z).
If you are wondering why you are looking at what appears to
be a weak b&w image don't be concerned. This is the "luminosity" layer
which holds the sharpness of your image. Look at the A and B channels, and
what you will notice is the distinct lack of sharpness in the image. This
is the advantage of using LAB. We could do all the work in RGB, but it would
require first applying the USM filter, and then using the Fade command
and choosing Luminosity mode to get the same result. Only problem is
you are processing the R, G, and B layers twice, and it takes more time since
we will have to USM and downsample the image four times before we hit our
target resolution of 72ppi.
With that in mind, now select Image, Image Size, and
with the Resample box checked, change the resolution
from 300 to 220 (from here on out I will refer to this as "downsampling".
This should drop the file size of the image by approximately half. Click on
OK. Now apply a USM of amount 140, .4 radius, and 7 threshold. Check
for obvious halos and if necessary remove or fade.
Downsample from 220 to 150ppi, again the file size should be
about half of what it was before. Apply another dose of USM, this time at
130 amount, .3 radius, 7 threshold. Look for obvious halos and if necessary
remove or fade.
Downsample again to 110 ppi. Apply USM at 110 amount .3 radius,
7 threshold. Check for obvious halos.
Downsample to 72ppi. If you are preparing images for web only,
you may wish to apply one more "hit" of USM, its your discretion. I typically
wait and do that just before or during the creation of a Jpeg for web use.
Convert back to RGB colorspace (Image, Mode, RGB).
imagedatabases | programs | IPTC standard | downsampling | filenaming
metalogging | captioning | keywording | guidelines | metalog resources
home | contact | sitemap