![]()
Import and Use
of your Controlled Vocabulary Keyword Catalog (CVKC)
with Adobe Lightroom 1.1+ (including versions 2.x, 3.x 4.x 5.x 6.x & CC)
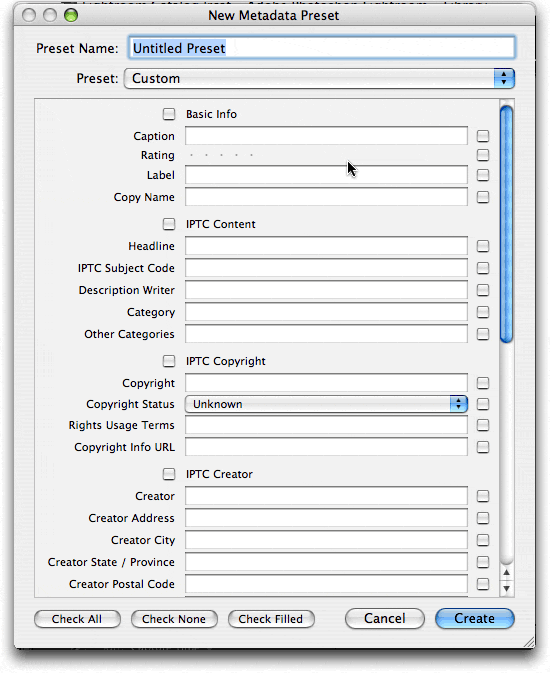
[please note] If you already have created an Adobe Lightroom keyword catalog that you may wish to "reload" at a later point, do note that the instructions given below will append the Controlled Vocabulary Keyword Catalog (CVKC) to your existing data. You may wish to "save" your existing data first using the Export button (as shown below) before you begin.
What is the Controlled Vocabulary Keyword Catalog or CVKC? If you are not familiar with this useful tool, you might want to first visit the product page for information regarding the Adobe Lightroom Version of the CVKC.
If you have other questions of a general nature, please check the CVKC-FAQ.
UPDATE: If you are installing the CVKC before upgrading from Lightroom 1.x. There is a bug that occurs in hierarchical keyword catalogs when you update Photoshop Lightroom 1.x to Lightroom 2. In version 2.0 the "Include On Export" keyword tag option is not selected, so that when you export your photos from Photoshop Lightroom 2, your keywords are not exported with your photos. Note, this is specific to those that "upgrade" Lightroom and does not affect those that are starting with the full version of Lightroom 2.0 that was just released. If you installed the CVKC in Lightroom 1.x and have upgraded to version 2, download and run the script available from the Adobe Self Service site.
The following topics are covered on this help page, clicking on the link will take you to that section of the page.
Installing the CVKC
files into Adobe Lightroom
Applying Keyword Tags from the
CVKC using Lightroom: General Method
Applying Keyword Tags from the
CVKC using Lightroom: Advanced Method
Adding New Keyword Tags to your Lightroom
CVKC
Adding Metadata on Import
Saving Metadata to Files
Using Lightroom Hierarchical
Keywords in Practice
Lightroom v 2.x Released!
The CVKC does work with all versions of Lightroom since 1.1. The
text file format for keyword import/export is unchanged from LR 1.1x, however
some of the features in Lightroom 2 and 3 have changed, so you may need to
make changes from how you applied keywords in version 1.1x. For example, the
keywords panel has moved from the left to the right side, and now features
a clickable checkbox that you can use to assign keywords.
I've Found you at long last: In addition there is a now a "Find" feature located at the top of the keywords panel. Simply type a word or a phrase, and any keyword that does not match that phrase drops out of the panel, except that any parents of a matching keyword will remain visible so you can navigate down to it.
Keyword Suggestions: Within the Keywording panel, there is a new section titled "Suggested Keywords" which will remind you of other possibly related keywords and save time in entering metadata. Suggestions are driven by previous correlations between keywords and also by proximity in time of keywords. (For example, if you've assigned the keyword "dog" to a photo taken at 3:45 p.m., another photo with a capture time of 3:47 p.m. the same day is likely to also share that same keyword.)
In addition there may be other keywords that you may not immediately think of or remember to apply. For instance, if you add the keyword "dog" to a photo of your dog you may receive a prompt to include the keyword "pet" or "animal." Lightroom also looks at other tags that you have used with your photos in the past and may offer these as suggestions as well.
Installing CVKC Files into Adobe Lightroom 1.x
Launch Adobe Lightroom after extracting the CVKC file from the compressed Adobe Lightroom CVKC file you downloaded from the Controlled Vocabulary website (See the UnZipping page if you are not familar with how to open or extract a Zip file).
Importing keyword files into Lightroom is done from the Library module. Follow the steps below to get started.
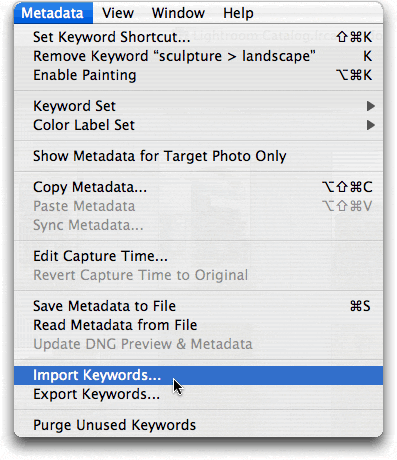
1. From the Metadata menu item, scroll down until you see the option to "Import Keywords."
2. Navigate to where you saved the cvkcv3_0-lightroom folder (most likely your desktop).
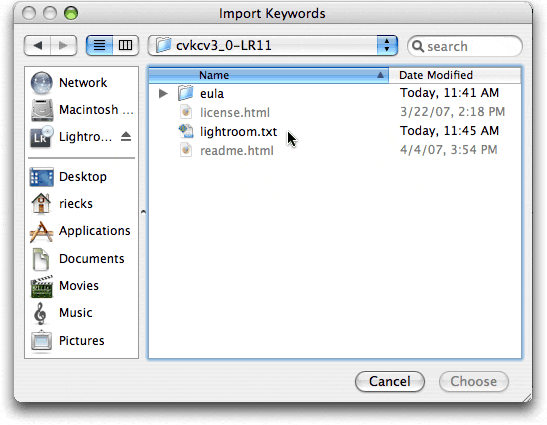
3. In the navigation dialog, open the folder, locate the Lightroom text file and select it.
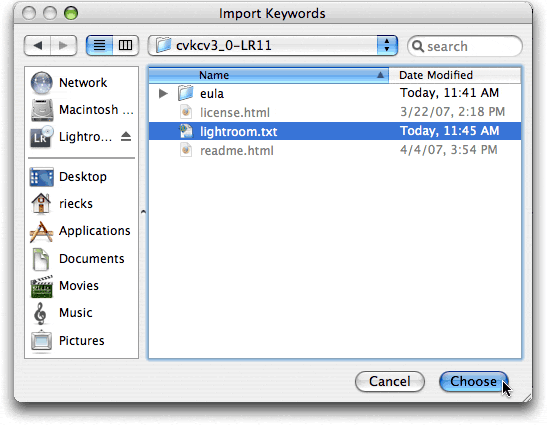
5. Click on the Choose button and wait a few moments.
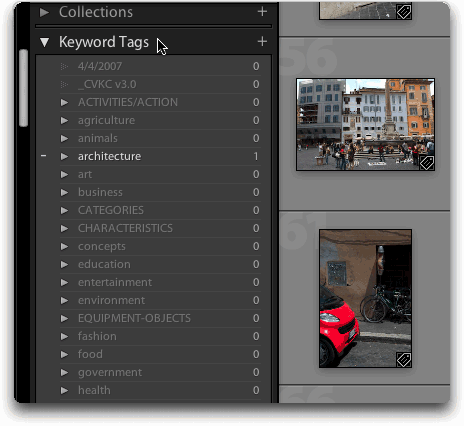
On some older systems it may appear that Lightroom is moving rather slowly, but wait a few moments and all will be fine. When installed you should see something like the following in the left panel of Lightroom.
Applying Keyword Tags from the CVKC using Lightroom
Like other metadata, keyword tags in Lightroom are initially stored in the application itself. They can also be stored in the photo file itself, or (in the case of RAW files) stored in XMP sidecar files. Once applied to photos (or from image files that are Exported from Lightroom), keywords can be read by any application that support IPTC or XMP metadata.
There are several ways to find appropriate keywords in Lightroom. The most straight-forward is to use the arrows to the left of terms at the top level (as shown above) and keep clicking on them to "drill down" through the various levels till you find the term you need. There are two other methods, one of which is not documented in the help file that are worth knowing. If you want to skip to that undocumented method of adding keywords just click here.
Once you have located the keyword you need, you can apply terms to images one at a time or in batches. This is done just like other selections. To select several contiguous images, click on the first image, then hold the shift key down before hitting the last in the series. To select images that are not located next to each other, simply click on the first, and then hold the Apple key/Cloverleaf (Mac), or Control key (Win) down as you click on each of the other images.
Then either drag the keyword from the Keyword Panel to the images, or drag the selected images to the keyword. A small "tag" icon will show in the lower right hand corner of the image.
Another way to do this with Lightroom 1.1x is to use the "Painter" tool. This is normally located at 1) on the user interface below the thumbnails. When the Painter tool is enabled, the mouse pointer becomes a Painter icon and the Painter icon is no longer visible in the toolbar. After choosing the Painter tool, check to make sure that Keywords is chosen from the pull down menu. Type the keyword or keywords you want to add or remove in the toolbar field (the area indicated with the number 2).
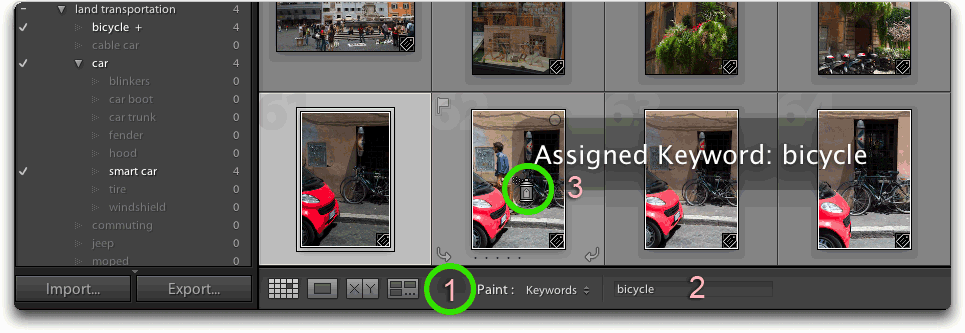
Once you’ve specified the keyword(s), you can quickly apply the keyword shortcut to photos by placing the Painter tool (as shown near number 3 above) over the image in question and clicking the mouse. On the first click, you'll see the note above, indicating that the keyword has been applied. If you click on the mouse a second time you will see that the keyword has been removed. When you are done assigning or removing keywords you need to disable the Painter tool. Simply click the circular well in the toolbar area indicated as 1 above.
Note: If the Painter tool does not appear in the toolbar, choose Painter from the toolbar menu.
1. In the Library module, do one of the following:
Choose Metadata > Enable Painting.
In the Grid view, click the Painter tool icon in the toolbar.
The Third Alternative for Adding Keywords:
There is a third alternative, and while a little cumbersome, it actually works
better than the other two in practice. It is decidedly "non-intuitive"
as this big box option has to be selected by using the pull-down menu in the
Keyword Tags section of the Keywording section in
the right-hand panel of Lightroom before you begin. I find it much
more efficient to use than the "painter" tool option which, unfortunately,
is the only one mentioned in the Lightroom help file!
Here's how it works.
1. First use the pull-down menu in the Keywording panel
(the one on the right side of the Lightroom window in the default mode) next
to the label Keyword Tags to select "Enter Keywords."
This is not to be confused with the header titled "Keyword Tags"
on the left side of Lightroom 1.x ((note if you are using Lightroom 2.x, this
is now called the "Keyword List" and is located on the right side
as well, just below the Keywording section).
2, Use your mouse to click into the field below that area so that the background
turns white (any existing keywords will be shown in black text).
3. Start typing the term you'd like to add. If you haven't added keywords
previously, then most of the keywords you see will be from the CVKC. If you
have terms that were embedded in the IPTC Keywords field outside of Lightroom,
these will also show up and possibly confuse you. The quick way to tell the
difference between those previously entered keywords and those in the CVKC
is that the latter will have a greater than symbol [>] separating parts
of the path. Typically these only show you two levels, however this is typically
enough to distinguish which branch is being accessed.
For example, if I have a photo that includes a dog, I can start typing "dog" and as I enter each character, the number of options available shrinks dramatically until after three letters, I'm down to the following:
dog > pets
dog > canine
dog racing
dog sledding > winter recreation
dog sledding > winter sports
dogwood
From there it should be fairly easy to make a selection.
4. If there is more than one term to select from, do not forget to use the arrow key to move down to your choice and most importantly, press the Enter/Return key to add this path, it's keywords (and synonyms if you are using the CVKC specifically for Lightroom). The box will turn back to a dark grey with the text in white once the term is officially entered.
5. If you want to see what other terms will be included with those core terms from the path, then change the pull down menu you changed before from "Enter Keywords" to "Will Export."
Do note that the default with Lightroom is to alphabetize all of the terms, and at this point there is no way to prevent that from occurring. As you can see this is a bit cumbersome if you switch the pull-down menu back and forth all the time, but there are fewer things that can go wrong than with the other two options.
You can read more about the various ways of applying keywords in this Adobe Keyword overview document.
Adding New Keyword Tags to your Lightroom CVKC
It is certainly possible to add new keywords. You can even create entire new sets of keywords (starting with an upper level term), or "hang" them off of an existing term within the current CVKC set within Lightroom.
To add a new keyword to your hierarchy, you need to work within the Keyword List panel.
Note: If you are dealing with "loose" keywords (those in your list, but not in your keyword hierarchy) you need to move them so that they fall under an existing top level (parent) keyword using drag and drop.