![]()
Import
and Use of your Controlled Vocabulary Keyword Catalog
with Photo Mechanic (from Camera Bits)
What is the Controlled Vocabulary Keyword Catalog or CVKC? If you are not familiar with this useful tool, you might want to first visit the product page for information regarding the Camerabits Photo Mechanic Version of the CVKC.
The following topics are covered on this help page, clicking on the link will take you to that section of the page. If you have other questions of a general nature, please check the CVKC-FAQ.
Installing CVKC Files In the Structured Keyword Dialog
Preference settings for an Adobe Workflow
How to Modify your "Find"
options in the Structured Keywords Dialog
Adding or Modifying Keywords in the Structured Keywords Dialog
Batch adding Filenames into the Document Title Field
Creating Desktop Thumbnails
Other Resources
Installing CVKC Files into the Structured Keyword Dialog
[please note] If you have a version of the catalog you may wish to "reload" at a later point, do note that the instructions given below will replace your existing data. If so, make sure you "save" your existing data first using the Save button on the Structured Keyword dialog window.
Launch Photo Mechanic and use the following steps:
1. Extract the CVKC text file from the compressed file you downloaded from the Controlled Vocabulary website (See the UnZipping page if you are not familar with how to open or extract a Zip file).
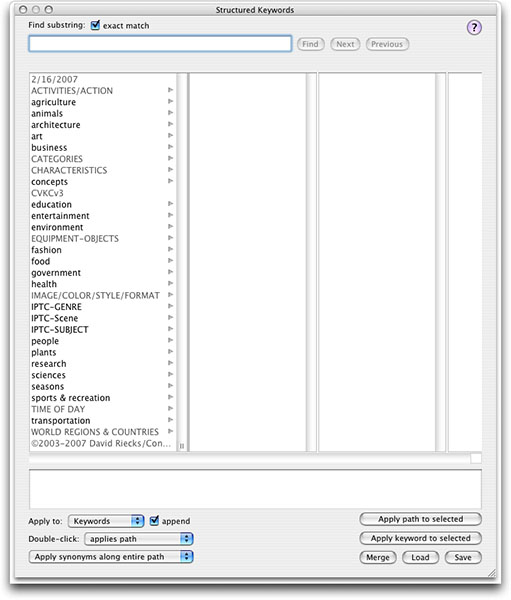
2. Open the Structured Keywords
Panel, located under the Image menu.
Keyboard shortcuts are Command + Option + K (Mac) or Control
+ Shift + K (Windows).
3. Import the new version by using the Load or Merge buttons.
The Merge button will retain any changes you have made to the sample catalog
included
with Photo Mechanic 4.5.
The Load button will replace the existing file with
the new catalog file.
4. In the navigation dialog, locate the file you unzipped earlier -- it's the one called PhotoMechanic.txt (unless you have an old version which would end in .utf8) -- and click on the Open button. [note; if you are modifying your version of the CVKC in a text editor, the text file format needs to be UTF-8 encoded. If you're not using any non-ASCII (0-9, A-Z, a-z, and punctuation only) then this won't matter. However, if you're entering accented characters or characters from a language like Japanese, Chinese, etc. then it is imperative that you use a text editor which can save out the resulting file using UTF-8 encoded text.]
5. You should now see a date in the upper left of the column browser and below that the version number of the CVKC such as shown in the screen capture below.
Preference Settings for an Adobe Workflow
The default settings for Photo Mechanic are typically set to write metadata directly to the RAW file. If you are shooting RAW digital files that will become part of an Adobe Workflow (such as going to Adobe Camera RAW, Adobe Bridge, or Lightroom), then you'll probably want your preferences for reading/writing IPTC/XMP to look like the following (these would apply if shooting RAW + Jpeg, or RAW files).
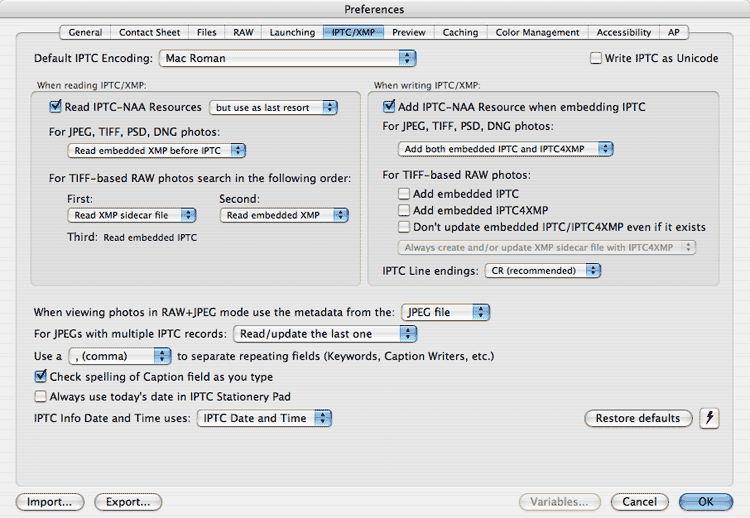
In order to prevent color setting information that is being written by Adobe Camera RAW, Adobe Bridge, or Lightroom from being overwritten or overlooked it is best to store all metadata an XMP sidecar if you are using an "Adobe Only" workflow. This way, if you return to Photo Mechanic to make additional annotations or change existing metadata, you won't end up losing any of the work that you have done.
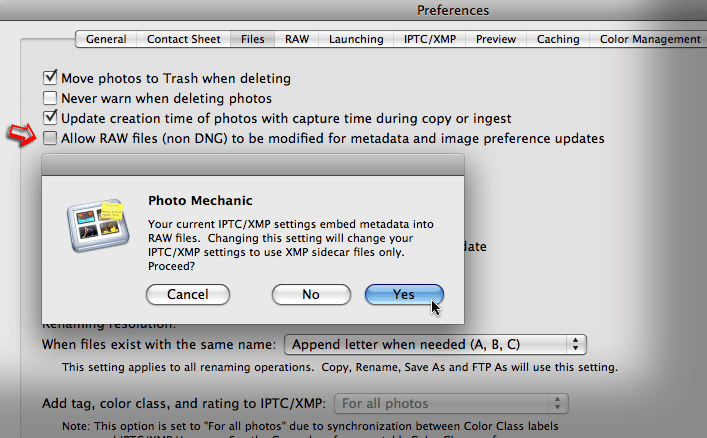
If you are writing XMP sidecards for files other than DNG, you may also want to uncheck the option to "Allow RAW files (non DNG) to be modified for metadata and image preference updates" under the Files tab. When you do that you will see another dialogue warning you that that changing this setting will change your IPTC/XMP settings to use XMP sidecars only. This is especially useful if you are using any checksum operations, like MD5 hashes to check whether any files have changed from when they were first placed at that location.
How to Modify your "Find" options in the Structured Keywords Dialog
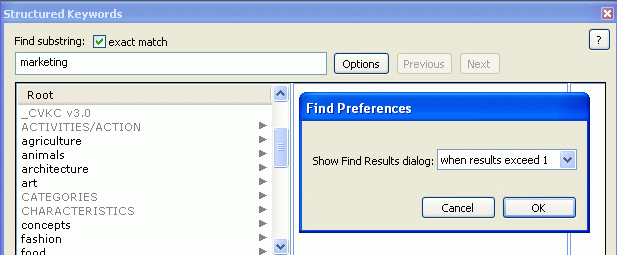
A new Find Results dialog and Find preferences was added to the Structured Keywords dialog/panel in version 4.5.2. To activate, simply hold down the shortcut key (Shift on Windows, Option on Mac) while in the Structured Keywords dialog/panel and the Find button will change to Options. Clicking on the Options button will show a preference dialog that lets you control how many Find hits are required to cause the Find Results dialog to appear. The Find Results dialog gives you a list of all the hits that matched your Find terms. I have mine set to "when results exceed 1."
Adding or Modifying Keywords in the Structured Keywords Dialog
It's not a difficult process to begin modifying the CVKC within the Structured Keywords dialog. If you have a large number that need to be entered all under one level, or you need items to be moved from one level to another, that may be more easily accomplished with a text editor, such as the free TextWrangler from BareBones software. [Details about this process are available in the Controlled Vocabulary Forum].
If you have less than 15 or 20 items, and they are all in different areas of the Controlled Vocabulary Keyword Catalog, then it's a simple process to enter them directly, using the Structured Keyword dialog. Proceed as follows. First, find the level above where the term will be placed and simply control + click [Mac] or right-click [Windows] on the term immediately above where you want to enter the new term. A contact sensitive menu will appear, giving you the following options.
Rename
Create child item
Create Synonym
Create sibling item
Set type to Synonym
Set type to Category
Delete
Rename should only be used if you want to rename the selected term. Since we want to add a new term, we will use one of the next three options. As you might guess, each has a separate purpose, so lets discuss these a little further.
If you want a term to appear in the next column as part of the hierarchical branch under the item in question, then use Create child item. Be sure to type in (or paste) the term you wish to add as a keyword, and then press the Enter key on your keyboard.
If this term should be a synonym for the term in question, then use Create Synonym, type/paste in the term and hit the Enter key.
The Create sibling item command will create another term at the same level (in the same column) as the term in question. As above, type/paste in the term and hit the Enter key.
The two Set type to commands only apply to terms that already exist in the hierarchy. Using these will not open a dialog box where you can enter a term, they only modify the term selected.
The last option, Delete will remove the term from the hierarchy. Be care with this option, there is no warning dialog, the term is deleted immediately and there is no way to "undo" a deletion.
Batch adding Filenames into the Document Title Field
You can use a renaming variable or token within the IPTC Stationary pad in Photo Mechanic to add the filename of the image to a metadata field embedded in the image. This is very handy and aids in identifying an image later should a client or end user change the filename in the folder view.
Here's how to do this in a few short steps to an individual or selection of images.
In the thumbnail view, select the images in the folder for which you wish to add the filename to the Object Name field (Object Name is the same as the Title field in Photoshop). This can work for other fields as well, if you prefer to put the filename elsewhere.
Open the IPTC Stationary Pad, top item under the Image menu (on Mac the shortcut is Command + I).
Then put {filename} within the field in which you want the current filename (including extension) to appear, such as drp041279097a.jpg. If you want the filename without the extension, use {filenamebase} instead, and you'll just get drp041279097a.
Check the "apply" checkbox to the left of the field, clear checks from any other fields for which you don't want to apply metadata, and then click on the Apply Stationary to Selected button to apply the IPTC Stationery Pad to the selected photos.
You'll see a status bar as PM goes to work.
Creating Desktop Thumbnails
The Mac version of Photo Mechanic has a feature to create Desktop Thumbnails for those images that are showing a generic icon.
If you do occasionally browse folders and like to have the tiny image icon thumbnails, then this is a simple way to re-create (or create) them.
Look under the Tools menu:
Tools >> Generate Finder Icons
Choose this option, and afterwards you'll have tiny picture icons in place of your generic icons.
[Additional instructions on how to use Photo Mechanic and the CVKC are still being developed.]
Please note that your username and password will remain active for the period in question. You are welcome to check back from time to time, or you may wish to join the Controlled Vocabulary "group" by sending a note to (controlledvocabulary-subscribe@yahoogroups.com), or going to the bottom of the main page on the Controlled Vocabulary site at (http://ControlledVocabulary.com/). This list is primarily for the discussion of the use of controlled vocabulary in building and managing image databases, and dealing with metadata for image collections, but I will also post notices of catalog updates in addition to sending you an email.