![]()
Import
and Use of your Controlled Vocabulary
Keyword Catalog (CVKC) with Daminion 3.4 or later
This support page covers the import procedure for use of the Controlled Vocabulary Keyword Catalog with Daminion 3.4 or later.
What is the Controlled Vocabulary Keyword Catalog or CVKC? If you are not familiar with this useful tool, you might want to first visit the product page for information regarding the Daminion Version of the CVKC.
The following topics are covered on this help page or the Controlled Vocabulary website –clicking on the link will take you to that section of the page. For other general questions see the CVKC-FAQ.
Installing the CVKC
files into Daminion
"Tagging"
with Keywords using the CVKC in Daminion
Adding New Terms to your Controlled Vocabulary
in Daminion
Searching for Assets in Daminion
Other Resources
Installing CVKC Files into Daminion
In order to use the Controlled Vocabulary Keyword Catalog you need to be running at least Daminion 3.4, the instructions below pertain to version 4.5.
After downloading the CVKC for Daminion, you will need to "unzip" the file. (See the UnZipping page if you are not familiar with how to open or extract a Zip file). Note the location of the file you have extracted, or consider copying or moving the file to your desktop, as you will need to locate this file later in the import/installation process.
Open an existing Daminion catalog, or create a new one, as you can only import the CVKC into a catalog. If you are just starting with Daminion, you may want to import the CVKC terms into a new, empty catalog. Then you can rename a copy of that catalog before you begin importing assets.
The "Catalog Tags" panel (on left side of screen in the default configuration — as shown below) is pre-populated with various tags that can be used as filters. These "tags" are created from the embedded metadata in the file, or file system. For photos this might include automatically entered info like camera model, exposure settings, or date captured. Photo files can also include descriptions, keywords, and location information, as well as rights management information. For Adobe Acrobat (PDF), or Microsoft Power Point (PPT) files, you will see information (like keywords) that have been embedded into the file in the originating program. Some programs also have various rating or color labels that may be used to filter what images are shown as well.
The CVKC will appear under the Keywords filter after installation.
Importing the CVKC:
From the main menu, locate and click on the "Catalog" menu
item, to reveal the sub menu items, then click on the "Import
Tags" sub menu item to open the dialogue box you can use to
locate the CVKC text file you previously unzipped.
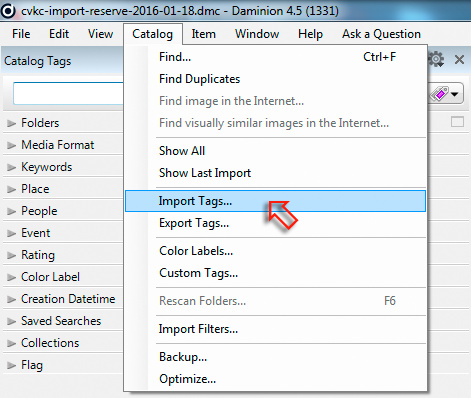
Locate the "cvkc-daminion.txt" file (unless you have your machine set to hide file extensions, in which case you won't see the .txt) and select it, then click on the "Open" button in the lower right of that dialogue.
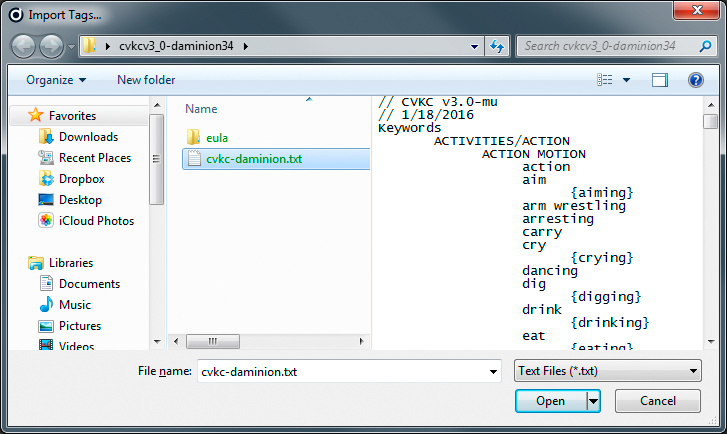
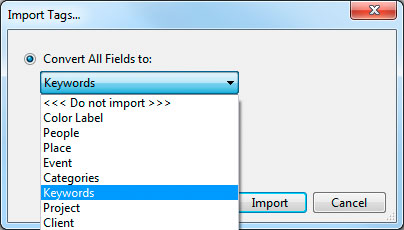
This will open a slightly different "Import Tags" dialogue. The default option is: "Keywords" though there are other options. If you import the CVKC file noted above this should look like this:
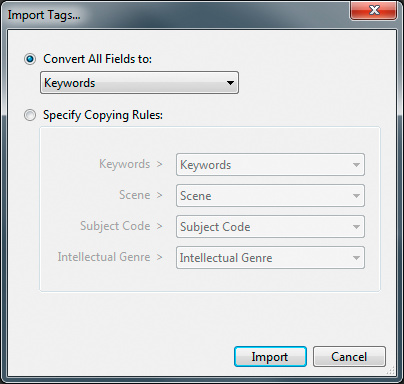
In order to bring the Keywords into the proper filter location in the Catalog Tags (as well as the IPTC Subject Codes, IPTC Scene, and IPTC Intellectual Genres) you need to change the radio button to the Specify Copying Rules option, like below. Then press on the "Import" button to begin the process.
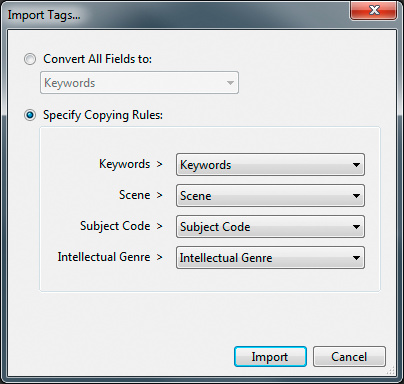
Note: If you are importing a vocabulary text file from elsewhere, or have heavily modified the CVKC, you might see something like this below. If so, make sure that your terms show up in the correct location.
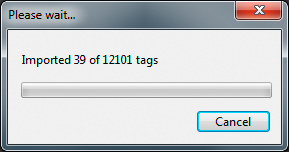
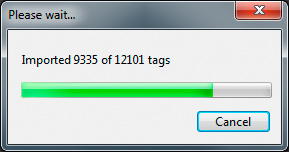
Because there are a large number of terms in the CVKC, this process will take some time (for instance, with a machine that is a few years old it might take 50 or 10 minutes). NOTE, the standalone versions may take considerably longer to import, due to the different database being used internally (SQLite vs. PostgreSQL). You can watch the status bar to see your progress. If you are just starting out with Daminion — or intend to have several catalogs for different materials — you may find it saves time to import the CVKC terms into a new, empty catalog. You can then close Daminion, make a copy of that empty catalog (reserving the first one), and rename the copy so you won't have to import the catalog a second time.
After the import is complete you should now see various values appear in the left panel where previously you would have seen the "No items" phrase, or a list of keywords already embedded into the assets that populated your catalog. If you imported into a new, empty catalog, the Catalog Tags panel will all show "0" (zero) items on the right side.
![]()
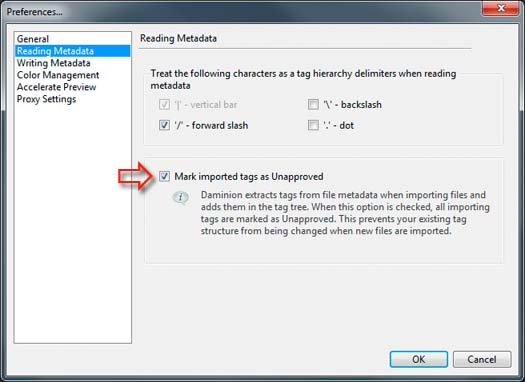
If you want to be able to distinguished between keywords assigned already applied, and those that are from within the CVKC, you'll want to make a change to the Preferences. Under the Edit menu, choose Preferences. In the Reading Metadata tab, make sure that the tick box next to Mark imported tags as Unapproved is checked.
After importing images, you can then toggle between the Approved, and Unapproved tags, or All Tags.
![]()
When you click on the arrow next to the Keywords filter, the preferred terms will appear as black text. The items in gray text that you see to the right in the parantheses are the synonyms that will be applied to the images [TK on export?]. If you hover your cursor above one of these terms you will see the phrase "Synonyms: [synonym names]" appear in a flyout dialogue.
You can control this behavior to some extent by right clicking on the black text in the list, and then choosing "Display Synonyms" from the context sensitive menu. This will toggle the synonyms off or on, depending on whether the check mark appears next to the "Display Synonyms" item.
Above that in the context sensitive menu is the option to add or edit the synonyms tied to that term.
Customizing Daminion Catalog Tags
I addition to the "Keyword" Daminion includes more than a dozen of these "Catalog Tags" in the default configuration. If you prefer, you can customize which of these options appear from more than 40 different "tag" options.
In the "Catalog Tags" tab at the left hand side of the application, locate the "Gear" icon and click on it to reveal the sub menu.
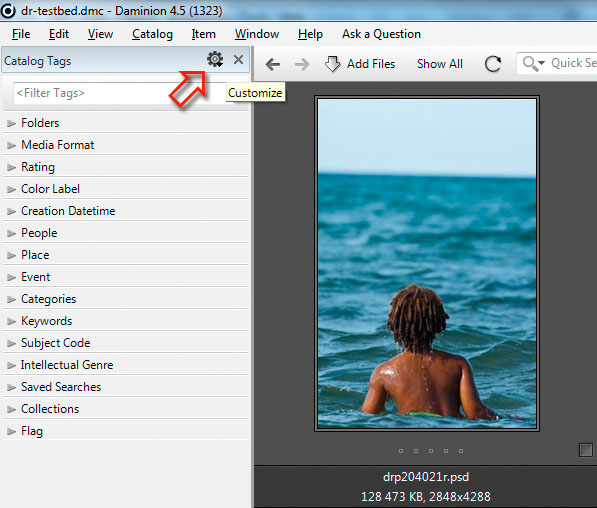
From that list, select "Customize..."
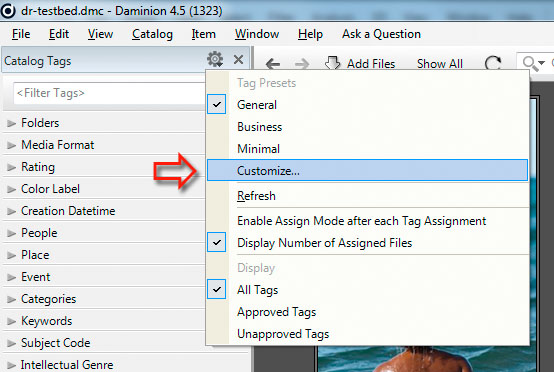
This will open an "Edit Preset" dialogue box.
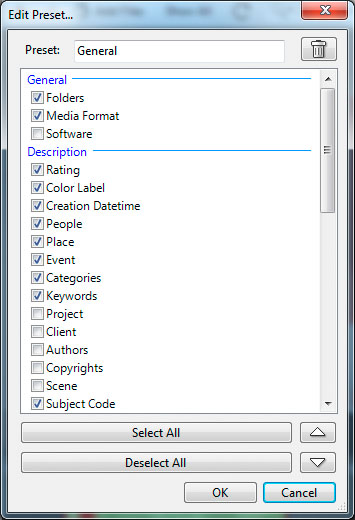
At minimum, you will want to have the Keywords field showing in the presets. If you only want to show a small number of these options it may be easier to simply click on the Deselect All to remove the checks from all the check boxes. Then click next to each check boxes for the other options you want to show. Note that there is an upward facing arrow next to the Select All button, and a downward pointing arrow next to the Deselect All button. These can be used to move the fields up or down, but only within the areas bordered by blue lines.
When you have this set to your preference, press the "OK" button to close that dialogue box.
You should now see only those items in the list at left under the "Catalog Tags" heading in the left panel. Catch the last couple of minutes of the Importing Assets video tutorial if you want to know more.
"Tagging" with Keywords in Daminion
There are several ways you can assign a keyword (add a tag) to an image in Daminion if you want the term to be from your controlled vocabulary.
1. Select the image or images for which you want to add the same keyword tag. Locate the term in the Catalog Tags panel at left by using the sideways pointing arrow next to the Keywords filter to open up the sub levels and then keep opening the arrows and dig down till you find the specific term you want to apply. Be careful, as there are "Unassigned" terms that may appear which come from images in the catalog that contain existing keywords. These Unassigned terms appear at the far left, but without an arrow to the left of them. The terms that are part of the controlled vocabulary hierarchy will have an arrow next to them, or will be indented as part of a cascade. Some of these terms may also have synonyms which will apear in the center panel (over the thumbnails) if you hover over the term in the Catalog Tags panel. After the keyword term is visible, drag the image selection to that term in the Keywords area of the Catalog Tags panel. You will briefly see the "Applying Tags" dialog apper over the thumbnails in the center panel. You can also Right Click on the term in the Catalog Tags panel, and then choose the top option from the pop up menu to "Assign [keyword] to selected (#) items. If you only have one asset selected, then the number in the parantheses will be 1, otherwise it will be the number of the assets currently selected.
2. Select the image or images for which you want to add the same keyword tag. Locate the term in the Catalog Tags panel at left by typing into the <Filter Tags> window at the top of the Catalog Tags panel. You will see a list of possible terms appear as you type. In most instances there will be more than one, and some of these will be of the Unassigned type. Those coming from the Controlled Vocabulary list will be part of a hierarchy, represented by slashes "\" like people\[GENDER]\male\boy. Once you locate the term, click on it with the mouse to select it. As soon as you begin typing you'll see a number of options appear at the bottom of the Catalog Tags panel. If you double click on the string, then you will be transported to that location in the Keyword hierarchy. Then you can apply the keywords just as you did above. However, it's easier to leave the term string highlighted and simply drag the selection to the "slash string" itself. Or press both the "Shift+Enter" keys or hold the Shift key and Double Click on the selected tag. In either case you'll see the dialog briefly flash, "Applying Tags"
3. Select one or more images and add tags by typing below the Keywords field in the Description section of the Properties panel where it says "Add tag." As you type you will see the various options appear. The terms that come from the Controlled Vocabulary will have the hierarchy appear below the term in grayed out type. If there are more than one you can use the mouse or the down arrow key to select the term. If there are multiple terms you wish to apply, you can also complete the term with a comma, and as you type the second term, the options will appear again. When you are done, just press the enter key. The terms will appear between the Keywords label and the "Add tags" entry field. If you hover your mouse over these keywords, you'll see the term appear to the left, as part of it's cascading hierarchy. If there are synonyms you will see those appear below the preferred term with {curly braces} around them. You will need to either click on the Save button at the bottom of the Properties panel, or just click to another asset in order to save those entries to the database.
If you find that you have made a mistake, you can simply hover the mouse over a keyword in the Properties panel. An X in a circle will appear at the right hand side of the term. If you move the mouse over the X it will turn red, and if you click on this it will delete the keyword from that file. If you decide you wanted to keep the term you just deleted, just click on the "Undo" words that appear to the right hand side and they will magically return. If you deleted several entries, just continue clicking until the Undo words disappear to restore all your deletions.
For
additional information see the section on applying tags in the Daminion
Wiki:
Adding New Terms to your Controlled Vocabulary in Daminion
To add new terms to your Controlled Vocabulary Keyword Catalog first locate the term you wish to modify in the hierarchy using any of the methods mentioned in the applying keywords section above.
To add a keyword at a level below the selected term, press the Insert key. This will open a new "Add Tag" dialogue. Type the term you want to add into the "Keyword inside [selected keyword]" field. Then click on the "Create (Enter)" button in the dialogue, or press the "Enter" key.
If you Right Click on the term in question you have even more options. You can add a term below the current keyword, or at one level above. You can also edit, or display synonyms that are tied to the currently selected keyword. In addition you can correct a spelling using the Rename option, or even Delete or Cut the keyword from the hierarchy.
If you have spent any amount of time adding terms, you probably will want to be sure to back-up your work, by exporting the file, and storing this text file in a safe place (offsite or online). As it is a plain UTF-8 text file, it is actually quite compact, especially when compared to the size of most photo files with which you normally work. Do note that other Unassigned keywords will be included in this list.
Searching for Assets in Daminion
The search feature within Daminion is robust. You can type a query into the field at the top of the center of the thumbnail (center) panel and press on the magnifying glass button, or press the Enter key. Your results will be displayed as thumbnails in the center panel. The default is to search "All Words" and "Everywhere." However, you can change these using the small magnifying glass at the left of the search box. This will open a pull-down menu with many other options. Before performing another search, just click on the "Show All" button to the left of the Search box.
If you want to refine your search, click on the Advanced button to the right of the magnifying glass. This will open a new dialogue where you can construct your query using full boolean options. You can even save the query, which is then accessible in the "Saved Searches" filter in the Catalog Tag panel at left. See the Search section of the Daminion Wiki for even more details.
Please do note that because the "standalone" version of Daminion uses SQLite searches queries are Case Sensitive (unlike the Server version which uses PostgreSQL).
If you are having problems with the underlying Daminion program, check out the following: